
Shrinkage
Shrinkage is an adjustment applied to the gross volume of a product to account for the loss of the product during production, whether it be a known value or an estimate. The loss of product can be due to a number of reasons. Oil product could shrink due to changes in pressure, temperature, and fluid properties at the separator(s), leading to the release of dissolved gas. Gas could shrink for the same reason (leading to NGL extraction); it could be re-utilized onsite for gas lift operations, to run the compressor, or for electricity. Some of the gas could be flared for various reasons. As a result, only a certain fraction of the produced gas makes it to market. Hence we use shrinkage to go from gross volume to shrunk volume. Shrunk volume is then used to run economics. Shrinkage can be applied to any volume based product in PHDwin, as shrinkage factors will be applied to the gross volumes. The shrinkage can be entered as a percentage if it is an estimate, a fixed volume per month if it is a known value, or both. The Shrinkage form is used to add or modify the Shrinkage value for each case. Shrinkage models can be set up and applied to cases as shown in the example below. Creating a shrinkage model can save time especially when applied to multiple cases at the same time. In addition, using a model means users have one location to update shrinkage value rather than going into each case to update the shrinkage.
To apply shrinkage to any case
Click on the Forms fly out on the left-hand of the screen and under Case Production, double-click on Shrinkage.
To add products to apply shrinkage to:
- Drag and drop or double-click on the Products flyout to move the product to the shrinkage form.
- Click the
 to pin it in place.
Decks and Segments
For each shrinkage product, users may add up to three Decks and for each Deck there can be as many Segments as needed. A deck is a shrinkage method, and can be inputted as either a percentage or a fixed volume amount that allows users to specify how the shrinkage will be applied. If there are multiple shrinkage decks, the shrinkage will apply the first shrinkage method with a value and then apply the next method.
Multiple segments can be added for each deck to apply different shrinkage factors for different time periods. Enter the starting date for the first segment but the ending date will automatically be a year after the starting date. Modify this as appropriate, it does not have to be 12 months. The starting date for each segment will be equal to the ending date of the previous segment. The last segment will always end at the Economic Limit (ECL).
To add more than one shrinkage deck (%, fixed volume, %)
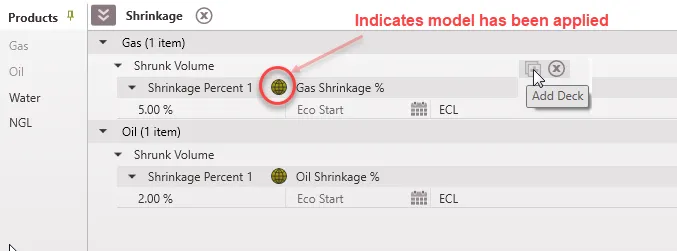
By default, users will see the first deck, where shrinkage can be entered as a percentage. Click the ![]() button next to the Shrunk Volume line to add another shrinkage deck. The second will be a fixed volume per month, and the third will be a percentage. The shrinkage decks will apply in the order that they appear on the shrinkage form. To add only fixed volume deck, leave the first shrinkage percent deck as 0% and input value for the shrinkage Add deck. To apply a single shrinkage factor, use the first or second deck to model that percentage or volume adjustment. Both percentage and volume adjustment can be applied. This should be done using either the first and second, or second and third decks, depending on the user’s preference on which should be applied first.
button next to the Shrunk Volume line to add another shrinkage deck. The second will be a fixed volume per month, and the third will be a percentage. The shrinkage decks will apply in the order that they appear on the shrinkage form. To add only fixed volume deck, leave the first shrinkage percent deck as 0% and input value for the shrinkage Add deck. To apply a single shrinkage factor, use the first or second deck to model that percentage or volume adjustment. Both percentage and volume adjustment can be applied. This should be done using either the first and second, or second and third decks, depending on the user’s preference on which should be applied first.
To apply a shrinkage model to one case
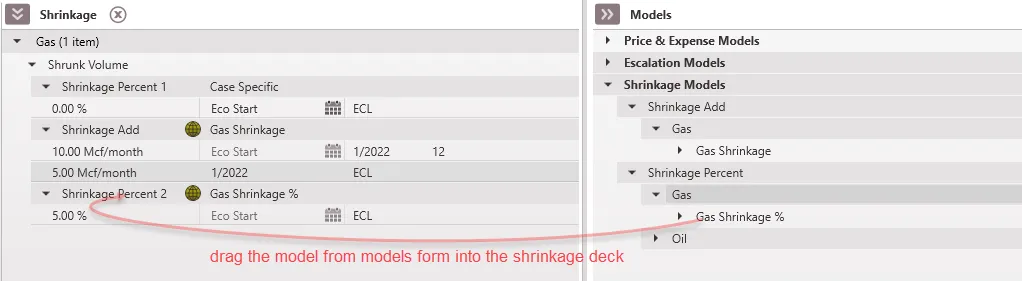
1.Go to the Forms Flyout and double-click on the Models form and the Shrinkage form to display them both if they are not already displayed.
2.Arrange the forms so that they are side by side as in the following image and make sure the proper products & decks are displayed.
3.Drag the model to apply from the Models form and drop it on the Shrinkage form directly on top of the deck apply it to that deck.
Once the model has been applied, it will have a dark green globe next to it as well as the model name. The models can only be edited from the models form. If you click on the globe, it will unlink model and make the shrinkage “local” and case specific so that you can edit on the case.
To add or edit case specific shrinkage
1.Double-click on the first line of the deck to set the:
•Shrinkage amount – which is the amount to shrink the product by. Enter this as either a percentage or volume per month depending on the deck being edited.
•The date the first segment of shrinkage begins – which can be chosen as a specific date or linked to the first production or economic start on the case.
•The number of months that segment should run for – the last segment will always continue until the economic limit
2.To add segments so that the shrinkage values change over time, hover over the name of the deck and click the ![]() button next to the deck. This adds a new segment and links the beginning date to the end date of the previous segment.
button next to the deck. This adds a new segment and links the beginning date to the end date of the previous segment.