Grid Editor
The Grid Editor is a tool used for viewing or changing input data in a tabular (Excel-like) format on one or more selected cases. This presentation is distinguished from the Global Editor by allowing for:
- Previewing existing inputs before editing
- Surgical editing of data where there are multiple entries per case.
The Grid Editor does not replace the Global Editor but rather acts as a complementary tool. Your data is best edited using the grid editor if:
- there are multiple records per case,
- data needs to be copied from one case to another, and/or
- values differ from case to case.
The Grid Editor does not have functions available through the editing of forms. Rather, it can help users quickly make changes to multiple cases without having to switch back and forth between cases for each edit. The Grid Editors grid format is also useful for comparing inputs for quality checking cases because it allows users to view multi-case data in a table format. Inappropriate data can quickly be identified by reviewing multi-case data patterns. Case specific and model linking is available with this editor.
Excel-like Cut, Paste and Drag features are supported in the grid editor. Special user defined formula fields (columns) can be added to help the user make interim calculations based on data in the grid. Contents of the formula columns are not imported to the case, but the user can copy the results of the calculation over to an existing column in the table. There is no option to delete or remove the formula columns as this is not necessary because PHDWin ignores the columns and does not import the contents. Excel exports from the grids are also supported.
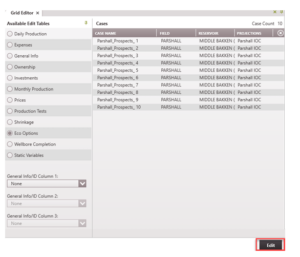
Once the Grid Editor form is open, select the cases as well as the data type to edit in the Grid Editor table.
To choose cases and open one of the Grid Editor tables:
-
Select the cases to edit by dragging and dropping them from the Case List into the Cases pane of the Grid Editor form.
You can select multiple cases on the Case List by using the following commands:
- Click + Shift – to select multiple cases in a row
- Click + Ctrl – to select individual cases that are not next to each other
- The summary nodes (∑) on the case list for the group cases set up in the sort order.
To remove one or more cases, hover over the case and click the 🗑️ button on the line next to the appropriate case or highlight the cases to remove, and hit Delete on the keyboard.
-
Select the type of data to change from the Available Edit Tables on the left.
- For non-General Info tables, users can select 3 additional General Info/ID Code columns to include in the grid edit display. The selected columns are displayed after the case name in the editor.
- Click Edit on the bottom right corner – This opens up the Grid Editor table for making changes to the data.
Editing, Importing from Excel & Saving the Data
Once Grid Editor table is open, users can make changes to any of the values in the table by typing the correct values or choosing from one of the drop-down menus in the grid. It is also possible to
copy and paste data from Excel. Simply highlight the cells in Excel, then use Ctrl+C or right-click and select Copy to copy the data. Open up PHDwin and highlight the cells in the Grid Editor that you are editing. Click Ctrl+V or right-click and hit Paste to insert the copied data from Excel. Similar to the Excel function, you can drag the small box in the bottom right corner of the box to adjacent cells to copy the data over to other cells.
Note: In any given table, columns with red entries cannot be edited – users can only edit columns with black entries.
Special Formatting
Certain columns require specific formatting in order to be a valid input. For example, any manually typed or linked date has to be formatted correctly in order for the program to apply the desired
changes. To ensure that valid inputs are entered, some columns are equipped drop-down menus or special editors.
Adding New rows
To add a row Users can add rows to the grid if there is a need to add new records. For example, to add a new investment to a case, a new row may be required. To do this, right-click on a cell/row and choose to Insert Row Above (Alt + A) or Insert Row Below (Alt + B) the selected row/cell. When a new row is added, fill out as much information as needed to populate the cells in the new row. However, one thing to do is make sure to fill out the column for Case ID, because this is how PHDWin identifies what case to pull the data back to.
Saving Your Changes Once all changes are made, click Save to save changes or Cancel to exit the editor without saving the changes.
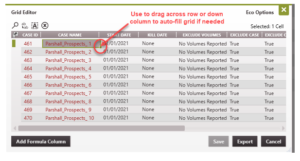
Displaying and Sorting Columns Show or hide columns by clicking on the icon on the top left [icon]. A checklist of the available columns pops up to enable users choose which columns should be displayed on the Grid Editor.
Sort the data in the grid editor by clicking on the header of any column to make it ascending or descending. Multiple sort levels can be utilized by holding down the Ctrl key and clicking on the next column to sort by.
Grid Editor Tools The toolbar at the top of the Grid Editor window allows users to locate and edit information within the Grid Editor.
- Find – Searches the Grid Editor. Choose to match case or match entire cell.
- Find and Replace – Finds and Replaces text in the Grid Editor. Choose to match case or match entire cell.
- Select All – Selects all cells in the Grid Editor.
- Delete Selected Rows – Deletes any highlighted rows from the Grid Editor.
Using Formulas and Exporting to Excel
To Manipulate Values Using Formulas
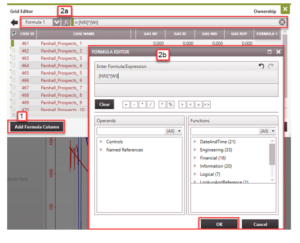
It might be useful to create formulas for column values by using variables in other columns. In order to use formulas in the Grid Editor, create a new column. Formulas cannot be entered in any of the pre-existing cells in the Grid Editor. To manipulate values using formulas:
- .Click on Add Formula Column in the bottom left corner of the window.
-
Enter the formula in the box at the top with the ƒx next to it. Click on the ƒx to open the formula editor and view all available variables. The formula will be the same for the entire column.
To reference other columns in your formula, start to type the name of the column such as “NRI” and then select the correct option suggested. The proper formatting will be the name of the column in brackets, for example: -[NRI]*[WI]. Click OK when done editing the formula.
If this is the first formula created, PHDWin enters the result in a column called Formula 1. Additional columns are named Formula 2, and so on.
-
Copy and paste the calculated values into the target column to adjust its values. In the example below, a change was made to the working interest. The revenue interest was re-calculated using the formula. The results in the formula 1 column needs to be copied back into the revenue interest column. Save and update the ownership values of the selected cases.
Exporting to Excel
These calculations can also be done in Excel and copied back into the Grid Editor. Click the Export button on the bottom right to send the values to an excel spreadsheet. This will create a new spreadsheet if Microsoft Office is available in your operating system. Once this is done, there is no link back to PHDwin. However, you can still make changes, copy and paste them back into the PHDwin Grid Editor, and Save.
Special Formatting for Each Table
Specific Formatting
Some columns in the Grid Editor require specific formats in order for the program to recognize the values users are trying to pull back.
For some items, like Case Name, users can type in any desired value. However, some items — such as reserve classes and categories, investment categories, and Fields/Reservoirs/Zones (which are specified in the Database settings) — are accessible using a drop-down menu in the Grid Editor.
When making edits to these fields in the Grid Editor, users are only able to select from the list provided for the category or location as set up in the Database settings.
Another good example of a field that requires a specific format is linked dates. Let’s say an investment was scheduled to be linked to the economic limit of the case. Notice that when you view the investment date column in the Grid Editor, the value may look like this: ECL[Current Case](+30)
This means the investment is linked to 30 days after the calculated economic limit of the current case. Linked dates must be formatted properly to avoid getting a validation error when pulling back the data.
Best Practice: When trying to make a change to multiple cases, it is advisable to set up the data correctly for one of the cases in PHDWin before switching to the Grid Editor to make the changes to the other cases. This gives you a clear idea of what the correct formatting should look like.
Editing Tables in Grid Editor The links below contain an overview of how to edit the specified tables in the Grid Editor:
Error Reports

After a user clicks Apply to save the changes made in the Grid Editor, PHDwin validates the data entered. If there are issues with the formatting or values entered in the Grid Editor, a notification
pops up in the lower right-hand corner of PHDwin mentioning the error. In fact, most aspects of the Grid Editor have been designed to prevent users from entering invalid values to limit these
errors from build 10+. The error shown here was from earlier build of V3.
Click on Show Grid Editor Report to get a list of the cases that were not updated. This report will show all of the lines that were not updated along with a description of why a certain record was not updated. Use the search bar to look up specific cases or warnings to see which errors applied to
which cases. Again, the error shown below was from earlier build of V3.
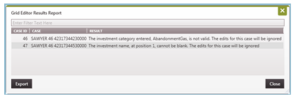
If a case is listed in the Error Report, it means that all of the edits for the case was ignored, even if some of the changes made were valid. For example, if a user typed in an invalid investment category, but also changed the value of the investment, neither of these changes will be stored. Go back and correct the invalid categories in order to make sure the other changes are saved.
What Happens while Multiple Users are in the Database?
If you are working in a database with other users, the Grid Editor cannot make changes to a case that someone is working on, or editing at the time you saved the changes made.
How do Grid Edits Work with Qualified Data?
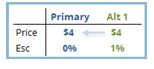
If you are using a hierarchy of qualifiers, the Grid Editor will always display the data for the top qualifier that “has data” or is populated with some value, even if that value is a forced zero. This is called the effective qualifier. The effective qualifier is the qualifier that has data. It could be the primary qualifier or any of the alternate qualifiers for a given qualifier category. For example,consider the following qualifier hierarchy set up for Scenario A.
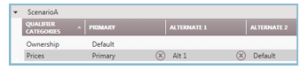
The Ownership section only has one qualifier, which is the default. Before viewing and editing the Ownership in the Grid Editor, every data is from the default qualifier and any change made would be saved to the default qualifier. Hence, the default qualifier is both the primary and effective qualifier.
However, as shown, the Prices section has a Primary Qualifier (named Primary) and one Alternate Qualifier (named Alt 1). When the Grid Editor is opened, it shows values for the effective qualifier. This could be different from case to case. The effective qualifier might be Primary for one case, and Alt 1 for another.
So when editing a case in Grid Editor, the values from the effective qualifier are displayed. For example, if a user is modifying the prices using the Grid Editor and only the Alt 1 qualifier “has data” or is populated with a price schedule, Alt 1 becomes the effective qualifier. The values in Alt 1 is visible when the Grid Editor is opened, even though there is a Primary qualifier set up for the price section.
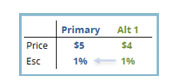
Here are some examples on what would happen if a user edits a row, leaves it untouched, or deletes it. For these examples, we will assume that Alt 1 is the effective qualifier. The example case has a gas price of $4/bbl as well as a 1% escalation applied in the Alt 1 Qualifier.
Edit an Existing Row If any record/row for one case is edited, the new value will be assigned to the primary qualifier, but value for the alternate qualifier remains unchanged. If there is more than one component to the qualifier (like a price and an escalation, or multiple investments), the untouched records for that case will also be copied to the primary qualifier.
For example – change in gas price from $40 to $5, but no change on the 1% escalation. As a result:
- the price in the Primary qualifier will be changed to $5, but the price in the Alt 1 qualifier remains $40.
- once the user edited one row for this case, the untouched row (or the escalation) is copied from the Alt 1 qualifier to the Primary qualifier.
Don’t Edit Any Rows for a Case
If all records/rows for the case are untouched, the values remain in the qualifier that it was in when you opened grid editor. Since this qualifier has data, it is the effective qualifier. For example
don’t make a change to the prices at all for one case. As a result, the entire price schedule would stay in Alt 1 qualifier and Primary qualifier would be blank, or null. No changes are made. Alt 1 is the effective qualifier.
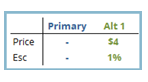
If You Delete Any Rows for a Case
If any record/row for a case is deleted, the delete row now has a value of 0, which is different from not being populated (that is, the row is not blank, it has a value of 0). If there are more than one
component to the qualifier (like a price and an escalation, or multiple investments), the untouched records for that case will be copied to the primary qualifier. For example – delete the row/record for the 1% escalation. As a result:
othe escalation value in the Primary qualifier changes to 0%, and the value in the Alt 1 qualifier remains 1%.
osince one row for this case has been edited, the untouched row (or the base price) is copied from the Alt 1 qualifier to the Primary qualifier.