
Expenses
There are two types of expenses in general: Operating Expenses (Opex) and capital expenses (Capex). Opex are directly related to the operation of the asset and are commonly recurring regular expenses. Capital Expenses or Investments are related to the development or abandonment of an asset and typically are not recurring expenses, but are one-time expenses with long-term benefit and whose values are recovered over a longer period. Operating Expenses are included in the economic limit calculation of a case while Capital Expenses are used to determine the commerciality of an asset.
In PHDwin, the expenses form is used for entering opex values for the case while the investment form is used to enter capex values. This section discusses operating expenses, hence, expenses refer directly to opex. See the investment section for a discussion of capital expenses.
Expenses are set up very similarly to prices. They can be scheduled as a fixed amount per month or variable based on the production of a certain product. Expenses can also be escalated over time. An escalation is defined as a compounding change in the base expense over time. Two methods are implemented for expense: fixed (Add) escalation and Percentage escalation. When both methods of escalation are used, the Percentage escalation is applied first on the base expense before the Add escalation is applied to the result to obtain the final expense value used to generate cash flow for the period. Expenses (and associated escalations) can be entered on a case either as case specific or created as a model and applied to several cases. However, because costs are often inconsistent, expenses will often be case specific values. There are five default expense streams, with options to create custom streams.
Available Default Expense Streams
The default expense streams are:
•Operating cost – variable – per unit of production
•Transportation cost – variable – per unit of production
•Other cost – variable – per unit of production
•Case cost – fixed cost per month
•Well cost – fixed cost per well per month
•Days On – variable cost per day (can be a fixed, operating, or other cost). Need to forecast “Days On” on the graph to apply this stream. May be applicable in certain situations with curtailed production.
All costs are netted down using the working interest by default except for the Transportation cost, which is netted down using the Revenue Interest.
To Add or Edit the Expenses
Click on the Forms flyout and then double-click on Expenses.
Applying Expenses in PHDwin
Just like pricing, expenses can can hard coded with case-specific values or linked to expense models – or a combination of both. For any cost that will be the same across multiple cases, the recommended strategy is to create a model and apply it to those cases. For costs that are case-specific, hard-code those values.
To Associate a Product with an Expense
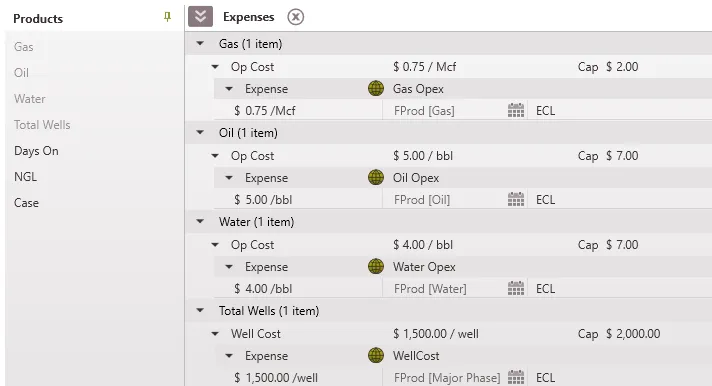
Default products are listed on the side of the expense form. This includes Total Wells, used to apply costs per well, and Case, to apply a fixed cost per month per case. Other products are Gas, Oil, Water, NGL, and Days On. To add a product to apply an expense to:
- Click on the Products Flyout.
- Click the
 to pin it in place.
 - Double-click on the name of the product to add or drag and drop it into the Expense window.
- Volume based products (Oil, Gas, and Water) have three default streams associated with them: Operating, Transportation, and Other Costs. Users can apply decks, add as many segments as needed, and apply models to each of these decks for a given stream.
- Case and Total Wells product only has one default stream because these are fixed costs.
Note: If a custom expense stream is created in the Database Settings, it becomes available for all products.
To Apply an Expense Model to One Case
To Build an Expense Model
Building an expense model is very similar to hard-coding the values on the Expense form, except that the model is built in the Models form and saved to be applied later.

1.Go to the Forms Flyout and double-click on the Models form if it’s not already displayed.
2.Click on the ![]() next to Expense and select the product to build the model for.To model a fixed cost, select Case. To model a well cost, select Total Wells. For other products, select the product and apply it to any stream (such as a trans cost, op cost or other cost).
next to Expense and select the product to build the model for.To model a fixed cost, select Case. To model a well cost, select Total Wells. For other products, select the product and apply it to any stream (such as a trans cost, op cost or other cost).
3.Give the model a name.
4.Click on the ![]() next to the name to choose the units and currency for the model.
next to the name to choose the units and currency for the model.
5.Fill out the value for the first segment & the beginning date. If there is only one segment, the segment will continue until the economic limit.
6.To change the cost amount over time, click on the ![]() next to the model name in order to add more segments. Adjust the number of months that each segment can continue as appropriate. The last segment will always end at the economic limit.
next to the model name in order to add more segments. Adjust the number of months that each segment can continue as appropriate. The last segment will always end at the economic limit.
To Apply an Expense Model to One Case
1.Go to the Forms Flyout and double-click on the Models form and the Expenses form to display them both if they are not already displayed.
2.Drag the model from the Models form and drop it on the Expenses form directly on top of the proper stream and deck to apply it. For example, if it is a gas trans cost, it should go on top of that deck as shown below.
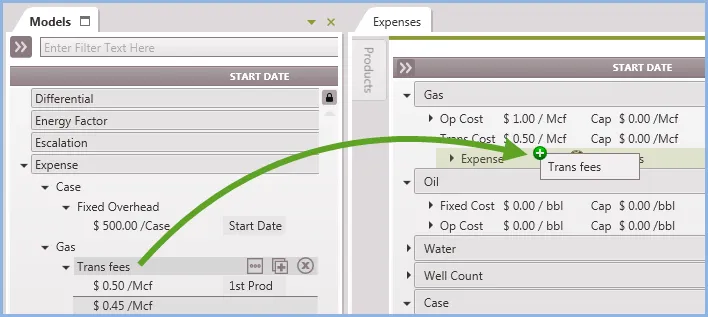
Once the model has been applied, it will have a dark green globe next to it ![]() as well as the model name, which indicates a model has been applied. The models can only be edited from the models form. Clicking on the globe brings the model local, that is, disconnects (unlinks) the model and makes the values case-specific. Any hard-coded expenses will have the name ‘Case specific’ next to them.
as well as the model name, which indicates a model has been applied. The models can only be edited from the models form. Clicking on the globe brings the model local, that is, disconnects (unlinks) the model and makes the values case-specific. Any hard-coded expenses will have the name ‘Case specific’ next to them.
To Edit Case-specific Expenses
To Hard-code the Expense Components
1.Make sure the product to apply the model to is displayed. If not, click on the Products Flyout and double-click on the name of the product to display it.
2.If no expense stream is visible, add an expense by clicking the ![]() button next to the Product name. Depending on the product, the expense stream options will be Op Cost, Other Cost, Trans Cost, Fixed Cost, or Well Cost.
button next to the Product name. Depending on the product, the expense stream options will be Op Cost, Other Cost, Trans Cost, Fixed Cost, or Well Cost.
3.Next, click on the ![]() button next to the name of the stream to add the base Expense, Add Escalation (in $) or Percent Escalation.
button next to the name of the stream to add the base Expense, Add Escalation (in $) or Percent Escalation.
4.Now, adjust the deck value by double-clicking on the first line of the segment to set the:
•value of the expense or escalation for the first segment
•the date the segment begins – this can be a hard-coded date or a linked date (linked to eco start date, first production, first segment of major phase, etc.)
•the number of months that segment should run for – the last segment will always continue until the ECL
5.To change the value over time, hover over the name of the deck and use the ![]() button to add new segments. Continue to add multiple segments as needed. The last segment runs to the ECL of the case.
button to add new segments. Continue to add multiple segments as needed. The last segment runs to the ECL of the case.
To Add an Expense Cap
Expense caps can be entered so that the expense will not go over a preset limit when escalations are applied. Therefore, if an initial base expense is greater than the cap expense, the cap expense will be honored even if an escalation is applied on that expense.
To adjust the cap for case specific expenses:
- Double-click on the stream line where it says cap.
- Enter the cap value.
To Configure the Escalation Options
If you hover over the name of an escalation deck, use the ![]() button to set the options. Then, choose if the escalation should be Fixed. If the box is checked, it will be a Fixed Escalation. A Fixed Escalation will apply the escalation at the beginning of the segment and then hold the value constant along the extent of the segment. If the escalation is set to run until ECL, it will repeat every 12 months until the economic limit is reached. If the box is unchecked, a Continuous Escalation will escalate throughout the course of the year. The escalation value or percent is divided by 12, and then multiplied by the number of months to get the escalation for that time. That escalation value or percent is applied to the base expense to determine the escalated expense.
button to set the options. Then, choose if the escalation should be Fixed. If the box is checked, it will be a Fixed Escalation. A Fixed Escalation will apply the escalation at the beginning of the segment and then hold the value constant along the extent of the segment. If the escalation is set to run until ECL, it will repeat every 12 months until the economic limit is reached. If the box is unchecked, a Continuous Escalation will escalate throughout the course of the year. The escalation value or percent is divided by 12, and then multiplied by the number of months to get the escalation for that time. That escalation value or percent is applied to the base expense to determine the escalated expense.