
Troubleshooting
To Delete System Databases Created by PHDwin
1.Open up Microsoft SQL Server Management Studio.
2.Log in to the instance of Microsoft SQL Server that you’ve been using to create PHDwin databases.
3.On the left you will see the Object explorer, highlight Databases.
4.Press F7 on your keyboard to open the Object Explorer Details.
5.All databases created by the application will begin with “Phd“, whereas databases created by the users will begin with “Phd_”. Select all of the PHDwin databases you want to delete by using CTRL+Click or Shift+Click to highlight them all.
6.Right-click on any of the databases you’ve selected and then choose Delete.
Installing Extra Components – Utility
A startup utility is available in the main PHDwin installation folder that can be run to check for any missing prerequisite components. PHDwinStartup.exe should be run by a user with administrator privileges because the registry is not always readable by standard users.
It checks three prerequisites:
Note: If you see a prompt saying “.NET Framework 3.5 is required” (for example when using Transfer or importing V2 files), install .NET Framework 3.5 and try again. See the System Requirements page for how.
1.Microsoft .NET Framework 4.8.1: This is essential to running the GUI and creating Transfer files.
2.Microsoft ODBC Driver 13 for SQL Server: This is essential for the PHDwin Economics Engine. Without this driver, the splash screen may come up, but the EcoEngine won’t be able to connect to a database and the splash screen will indicate an error.
3.Microsoft Visual Studio C++ Redistributable 2015. Required for the import of .mdb files (e.g., ARIES).
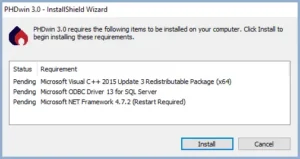
InstallShield Wizard Error Message
If you are missing any components, they will be listed for review. Click Install to download and install them. (Note: this may require a restart). Once you have restarted your computer, restart the installation by executing the PHDwin_3.1_Setup.exe file again
To Install Visual C++ Redistributable
1.Open windows explorer and go to the Downloads folder(or the location that you downloaded the file). Double-click on the file named msobdcsql131_x64.msi to begin the installation.
2. In the Setup window, check the box to Agree to the terms and conditions and click Install.
To Install the OBDC Driver 13 for SQL Server
1.Open windows explorer and go to the Downloads folder(or the location that you downloaded the file). Double-click on the file named msobdcsql131_x64.msi to begin the installation.
2.In the Setup window, click Next to begin the installation.
3.Accept the terms of the license agreement and click Next.
4.On the Feature Selection page, leave everything as is and click Next.
5.Once the setup is ready, click Install and then Finish.
To Install the SQL Native Client
1.Open windows explorer and go to the Downloads folder(or the location that you downloaded the file). Double-click on the file named sqlncli_x64.msi to begin the installation.
2.In the Setup window, click Next to begin the installation.
3.Accept the terms of the license agreement and click Next.
4.On the Feature Selection page, leave everything as is and click Next.
5.Once the setup is ready, click Install and then Finish.
6.You will have to restart your computer for the configuration changes to take effect.
Problem – The Server is Not Showing Up When I Try to Log In
If you are trying to log in to PHDwin but nothing is listed under “Server”, even when you click on the Browse button, try following the steps below to verify that SQL Server Browser is running and that you have enabled TCP/IP and Named Pipes.
Solution 1 – Verify that SQL Server Browser is Running Automatically
During the install, you should have set the SQL Server Browser to start automatically. If you didn’t, PHDwin will not be able to see the server as an available option when you try to log in.
To verify that the service is running automatically:
1.Start SQL Server Configuration Manager – Click Start, point to All Programs, and click Microsoft SQL Server. Click Configuration Tools, and then click SQL Server Configuration Manager.
2.In SQL Server Configuration Manager, in the console pane, click on SQL Server Services.
3.In the details pane, look for SQL Server Browser. The Start Mode should be set to Automatic. If it is set to “Other” or “Disabled”, right-click on SQL Server Browser and choose Properties.
4.In the Properties window, go to the Service tab and find the Start Mode. Change this to Automatic and click OK.
5.Right click on the SQL Server Browser and click Restart to apply the changes.
Solution 2 – Enable TCP/IP and Named Pipes
If you installed SQL Server locally on your machine, you can skip this step. If you installed SQL server on a network server and you or other users will need to connect to it, it requires you to enable TCP/IP and Named Pipes connections.
To enable TCP/IP and Named Pipes:
1.Start SQL Server Configuration Manager – Click Start, point to All Programs, and click Microsoft SQL Server. Click Configuration Tools, and then click SQL Server Configuration Manager.
2.In SQL Server Configuration Manager, in the console pane, expand SQL Server Network Configuration.
3.In the console pane, click Protocols for <instance_name>.
a.In the details pane, right-click TCP/IP, and then click Enable.
b.In the details pane, right-click Named Pipes, and then click Enable.
4.In the console pane, click SQL Server Services.
a.In the details pane, right-click SQL Server (<instance_name>), and then click Restart, to stop and restart the SQL Server service to apply the changes.
Further troubleshooting
For more information, see the article from Microsoft on “Troubleshoot connecting to the SQL Server Database Engine“.