
Global Editor
PHDwin utilizes a tool called the Global Editor to apply the same changes to one, many, or all cases in the database. The Global Editor makes it easier to make changes to several cases at a time, saving users valuable time used to edit cases individually. It uses the concept of “applying” changes to cases. This means users will not be able to edit the case inputs directly, but rather replace the inputs with the values applied to them. Most of the options available in the forms and models flyouts can also be found in the Global Editor and can be applied to any number of selected cases. For example, the Global Editor can be very useful for large databases with an extensive number of cases, where a user wants to apply one price model to all cases at once.
Global Edit is a powerful tool that enables users to quickly process their cases with similar input requirements. Consequently, there are various options within each Global Edit field that have different outcomes. Global Edits include application of Models (Price, Expense, Shrinkage, etc.), mass editing graph properties, ownerships, changing the phase configuration, and many more. To see the full list of options, open up the Global Editor and expand all the available fields. Note: There are certain qualified data such as clear expenses, prices, ownership, shrinkage, adjust projections,
To Open the Global Editor
To open the Global Editor, click on the Forms flyout and double-click on Global Editor. In the image below, 8 changes are being applied to 30 cases. The fields selected are Fiscal Models, 4 Expense Models, 2 Price Models, and Ownership setting copied from an existing case.
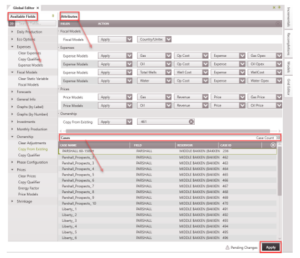
The left pane has a list of all Available Fields that can be modified using the global editor. Drag and drop as many fields to the Attributes pane to make the required changes to the cases shown in the Cases pane. These changes can only be applied when the Apply button is clicked.
To make an edit to one or more cases
1.Choose the cases for edit – to do this, open the case list and drag the cases that need to be edited from the case list into the bottom right section labeled Cases. To select multiple cases at
once, use Shift+Click or Ctrl+Click. If the case list is sorted with different groupings (for example a field or reservoir), click on the name of the group and drag it over to the Cases pane to make changes to all cases in the group. The number of cases selected is shown as Case Count on the top right of the Cases pane. To remove one or more cases, hover over the case and click the button on the line next to the appropriate case or highlight the cases and hit Delete on the keyboard. Deleting a case from the Case pane does NOT delete it from the Case List or database.
2.Choose what to edit
1.Look through the list of Available Fields on the left pane to find one field to edit. Drag it to the Attributes pane.
2.Use the drop-down menu in the field to make the desired selection.
3.Repeat this process until all the fields for which edit is desired have been selected. In the image above, this process was repeated 8 times to select all 8 fields shown.
3.Click Apply to effect the pending changes. Be aware that after the changes have been applied, the selected fields in the Attributes pane is cleared and a “Global Editor Completed” notification is briefly displayed at the bottom right corner of your screen.
The order of operations between steps 1 and 2 does not matter. For example, one user can go through step 2 first and then step 1 before applying the changes and the outcome will be the same.
Models
One of the most common uses of the global editor is applying models for things like prices and expenses. In the list of Available Fields in the Global Editor, several sections have fields with Models. These include Expense Models (Expenses), Fiscal Models, Link Model (Graphs), Price Models (Price), and Shrinkage Models (Shrinkage). When a model is selected and added to the Attributes Pane, additional steps (including Select Action) need to be taken. If applying a Fiscal Model, for example, two steps are required (select apply and then select model), while five steps are needed to apply an expense model.
These are the available fields for editing Models using the Global Editor:
·Expense Models – this allows users to choose any cost models already created in the database (Fixed, Op, Other, Trans, Well), apply it to, or remove (clear) it from selected cases at once.
·Fiscal Models – these are tax models to choose from to add, delete, or replace on selected cases.
·Price Models – this allows users to choose any price decks already created in the database and apply it to, or remove (clear) it from selected cases at once. The price models are product specific.
·Shrinkage Models – this is used to apply, remove, or delete any previously created shrinkage models from the selected cases. The shrinkage models are product specific.
·Fiscal models – choose the name of the template to apply it to selected cases.
For prices, expenses & shrinkage, more steps are required to get to the final model to apply:
·Firstly, select Apply, Bring Local, or Clear a model. There is no need to remove existing models before applying a new one. If a case already has a gas price model applied, using the Global Editor
To apply a new gas price model and replace the old one:
- Choosing “Clear” will delete the model from the product (not from the models form).
- Selecting “Bring Local” forces the model to become case-specific (this unlinks the model from the cases and the globe icon 🟡 is removed). For this approach of bringing a model local to work, that model has to be applied (or be already existing in the case) first before it can be brought local. A model that is not existing in the case cannot be brought local.
Steps to Apply the Model:
- Secondly, select the product – such as Oil, Gas, etc. When applying a fixed cost, the product to select is Case. When applying a well cost, the product is Well Count.
- Thirdly, select the stream to apply the model to. For prices, the only stream available is Revenue, unless a custom revenue stream has been created. For expenses, the stream can be Fixed Cost, Well Cost, Op Cost, Trans Cost, Other Cost or any other custom expense streams the user has created. For shrinkage, the available stream is Shrunk Volume.
- In the next drop-down, select the deck – which is the base price or expense, or the type of escalation, differential, or shrinkage if trying to do an escalation, differential, or shrinkage.
- The final step is to select the model. This will just be the name of the model to apply that is under the previous criteria. Users will have access to all the local models created to select from. If no model has been created, nothing will be available to select.
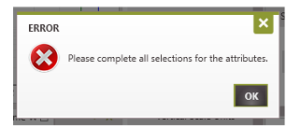
Important Note: Clicking Apply without making a selection for all the fields will result in an error saying “Please complete all selections for the attributes”.
Qualifiers
If a user starts with a blank/empty qualifier in the Primary slot, the qualified data (say ownership) that is visible for any qualified value will be from one of the Alternate qualifiers in the hierarchy. If the
user modifies the ownership in some way and want to revert back to the original value from the alternate qualifier, they cannot do it easily. One option is to rebuild it manually, which is difficult
without being able to see the values in that qualifier while making edits. A second option is to create a new qualifier that’s empty and readjust their hierarchy to match the initial set up. This creates an extra qualifier which is unnecessarily.
Through the Copy Qualifier Global Edit, Users can copy qualified data from an alternate qualifier within the current scenario to the primary qualifier level. When the user selects the option to copy a
qualifier, this will overwrite all relevant data of that qualified type in the current scenario. For example, selecting the Copy Qualifier option under Prices would overwrite Price, Price Differentials ($
and %), Price Escalations ($ and %), and Energy Factor for all products to match the data in the selected alternate qualifier. Be aware that even if the price was copied from an alternate qualifier, it
will be saved in the primary qualifier. The key takeaway here is that with the Copy Qualifier Global Edit, the user is able to “restore” and continue using the value in the alternate qualifier for
evaluation.
While Copy Qualifier provides the option to copy a specific qualifier in the hierarchy, Copy Effective Qualifier copies data from the highest qualifier in the hierarchy that has data for the case into the primary qualifier. Hence, if the qualifier in alternate 1 has data for case 1 and the qualifier in alternate 2 has data for case 2, copy effective qualifier copies the data from alternate 1 into primary for case 1 and copies the data from alternate 2 into primary for case 2. This is a very handy function to have, particularly because the user does not have to keep track of what qualifier has data for which case.
Daily Production
Daily Production refers to the daily production data for a specific product associated with each case. There is only one available field for editing the Daily Production using the Global Editor.
·Clear Products – This clears out the historical Daily Data for one or all products. The options are to choose to Clear All data or just the data before or after a specified date.
One note of warning: Be careful when clearing historical production. Since Daily historical production is an unqualified data, clearing product this way wipes out all historical production even in alternate qualifiers.
Eco Options
The available fields for editing the Eco Options using the Global Editor are:
·Economic Life – This changes the Case Life setting on the Eco Options form.
·Economic Start – This changes the Economic Start setting on the Eco Options form.
·Extended Life – This extends the economic limit of economic cases by the specified number of months after the ECL date. Extended life adjusts the ECL after any specified minimum life has been applied.
·Kill Date – This is used to apply or remove a kill date. The kill date will cutoff the case on the specified date if the case reaches the kill date before its own economic limit. Specify a Hard Date or use one of the options available.
·Minimum Life – This extends the economic limit of cases by the specified number of months after the Eco Start Date.
Expenses
The available fields for editing Expenses using the Global Editor are:
- Clear Expenses – Clears all the expenses for the specified product for all cases selected.
- Copy Effective Qualifier – Allows the user to copy the expenses from the effective qualifier into any of the listed qualifiers.
- Copy Qualifier – Allows the user to copy the expenses from any of the alternate qualifiers.
- Expense Models – Apply an expense model as described in the Models section above.
Fiscal Models
The available fields for editing Fiscal Models using the Global Editor are:
- Clear Static Variable – This clears the Static Variables for the selected cases. It returns case specific static variable values to the model defaults specified in the Fiscal Models form.
- Fiscal Models – Apply, Delete, or Remove Fiscal Models. To Apply a model, choose the name of the template to apply. To Delete a Model, choose the name of the template to delete. Remove combines the functionality of Delete and Apply. It has two options and replaces the first model with the second model. If a user erroneously applies two Texas Fiscal Models to a well in North Dakota, the user can choose to first Remove the Texas model and Apply the North Dakota model, or use the Remove option to replace the Texas model with the North Dakota model.
Forecasts
The available fields for editing forecasts using the Global Editor are:
- Align Start Date to Major Phase – This allows the user to adjust the (forecast) start date of the selected product to align with that of the major phase for the cases.
- Clear – This deletes the projections for the selected products.
- Copy Effective Qualifier – Allows the user to copy the projections from the effective qualifier into any of the listed qualifiers.
- Copy From Existing – Allows the user to copy the existing projections of one or all products from another case. To copy the projections set up in a case, drag the case from the Case List directly into the available slot called “Input Case ID”. Alternatively, input the Case ID of the case into this slot.
- Copy Qualifier – Allows the user to copy projections from any of the alternate qualifiers. The projections for all available products in the alternate qualifier are copied.
-
Curve Fit – ArpsThe following options allow the user to apply the Standard Autofit option to the selected cases using the Arps model. They specify the Dm, Min and Max b-factors to autofit the historical production data in the cases selected. If a forecast currently exists for the selected case(s) that is not Arps, that forecast will be replaced by an Arps forecast with the specified Dm value and b-factors.
- Force End Date – Allows the user to force the projection of the selected products to end at the specified date. This extends or shrinks the last segment of the selected product to match the specified end date.
- Force Start Date – Allows the user to force the projection of the selected products to start at the specified date. Offsets can be added to stagger the cases by a given number of days or months. The projections are moved to the specified start date. The end date is adjusted accordingly while the other projection parameters remain unchanged. This effectively moves the forecast without changing its shape.
- Lock Endpoint to Major Phase (Arps) – Allows the user to lock the endpoint of selected product to that of the major phase. This is only applicable to Arps Projection.
- Set Dm – Allows the user to set the Dm value for Arps Projection. If you currently have a forecast built for the selected case(s) that is not Arps, that forecast will be replaced by an Arps Projection with the chosen Dm value.
- Set Projection Precedence – Allows the user to specify which data should take precedence for calculations when there is an overlap between historical and projection data.
- Set Years Past EOP – Allows the user to set how much longer (in years) the forecast can run beyond the end of historical production. Setting this attribute unlocks the endpoint to major phase (Arps) projection if previously set. The user has to set the endpoints again.
- Shift Start Date – Allows the user to shift the projection start date of the selected products by a given amount (usually in days or months). This method preserves the initial production of the products before shifting the curve. It effectively “moves” the production profile by the specified amount without changing volumes.
- Trim before EOP (Arps) – Allows the user to remove the overlapping portion of the projection until the end of production.
- Truncate Start Date – Allows the user to cut the projection start date of the selected products to a specified date. This method effectively “deletes” all the data before the specified date.
General Info
These are the available fields for editing the General Info using the Global Editor. Several of them can be used to find and replace certain values, while others allow users to apply data from a drop-down menu.
Available Fields that allow users to apply or find and replace certain text include: Case Name, County, Country, Gas Gatherer, Location, Latitude,Longitude, Oil Gatherer, Operator, State, and Well.
If you select any of these options, you can choose to:
·Apply – Replaces the entire case name, regardless of what it was, with the exact text provided.
·Replace Match – Functions like ‘Find and replace’; it finds any instances of the text that entered in the first field and replaces them with the text entered in the second field. If there is unmatched text in the original string, it remains a part of the new text.
·Replace Entire – This function finds instances of the text entered in the first field and replaces them with the text entered in the second field. A given word must be matched to be replaced.
For example:
·Using Apply – You are using the Global Editor and have selected 3 cases. The cases are named Case 1, Case 2, and Well A.
This Global edit would result in the new case names of Lease, Lease, and Lease.
·Using Replace Match – You are using the Global Editor and have selected 3 cases. The cases are named Case 1, Case 2, and Well A.
![]()
This Global edit would result in the new case names of Lease 1, Lease 2, and Well A.
·Using Replace Entire – You are using the Global Editor and have selected 3 cases. The cases are named Case, Case, and Well A.
![]()
This Global edit would result in the new case names of Lease, Lease, and Well A.
Other Global Edits
- Convention – Choose from one of the predefined conventions in the Database settings.
- Currency – Choose from one of the predefined currencies from Database settings.
- Field Reservoir & Zone – Choose from one of the predefined FRZs in the Database settings.
- Lower Case – This field allows users to change any chosen General Info description to be all lower case.
- Major Phase – This field allows users to choose which product is the major phase.
- Mixed Case – This field allows users to change any chosen General Info description to be all mixed case (ex. changing the operator name from CHEVRON to Chevron).
- Offshore – Either enable the case as an offshore well with the option to also select “Deep Water”, or disable the setting, making it classified as an Onshore well.
- PRMS – Classification & Category – This field allows users to choose from one of the predefined classifications in the Database settings.
- PRMS Copy Effective Qualifier – Allows the user to copy the PRMS classification & category from the effective qualifier into any of the listed qualifiers.
- PRMS Copy Qualifier – Allows the user to copy the PRMS classification & category from any of the alternate qualifiers into the primary qualifier.
- Total Depth – This field allows users to define the Total Depth for one or several wells.
- Upper Case – This field allows users to change any chosen General Info description to be all upper case.
- Well Type – This field allows users to specify or change the well type on selected cases. Available options are: Any Type, Flow, INJ, Pump, Source, SWD or Unknown. These are not customizable.
Graphs
Two methods are available for modifying graphs using the Global Editor. Graphs can be modified by label (for example “30 Year OGW Rate Time”) or by number (for example 1 is the equivalent of the label option “30 Year OGW Rate Time”). The available fields for editing Graphs for each method using the Global Editor are:
- Copy Model Properties – This global edit allows users to copy the graph properties of one graph (Graph 1) to another graph (Graph 2) for each case. This is not the same as applying a graph model, because it will only change the properties of Graph 2 for the selected cases. Hence, after the global edit, if the properties of Graph 1 change, the properties of Graph 2 does not automatically change too.
- Edit Name – This global edit allows users to change the name of a graph to any name specified. This is useful when you copy a given model and want the graph name to reflect what model was applied.
- Link Model – When this global edit is applied, any changes to the model properties of Graph 1 will be reflected on other graphs that are linked to it. Users can also choose to remove the link (by selecting “Bring Local”). Doing this means the user would no longer see Graph 2 properties changed whenever Graph 1 properties are modified.
- Projection Qualifier – This option allows users to show or hide the projection of another qualifier in the graph selected.
- Scenario Projections – This option allows users to show or hide the projection of another scenario in the graph selected.
- Vertical Max – This option allows users to set the vertical axis maximum for any product in the graph selected.
- Vertical Min – This option allows users to set the vertical axis minimum for any product in the graph selected..
- Vertical Scale Units – This option allows users to set the vertical scale units for the convention and product in the graph selected.
- Y-Axis Auto Scale – This option allows users to Auto Scale any product in the graph selected.
Investments
The available fields for editing Investments using the Global Editor are:
- Clear All – Allows the user to delete all investments for the selected cases.
- Copy Effective Qualifier – Allows the user to copy the investments from the effective qualifier into any of the listed qualifiers.
- Copy From Existing – Allows the user to copy the existing investments from another case. To copy the investment set up in a case, drag the case from the Case List directly into the available slot called “Input Case ID”. Alternatively, input the Case ID of the case into this slot.
- Copy Qualifier – Allows the user to copy investment values from any of the alternate qualifiers. All available investments in the alternate qualifier are copied. However, if a custom working interest is specified, it is not copied.
- Set Inflation – This allows the user to apply an inflation model to the investments. Percent Escalation models are available for use as inflation models. Users can build a particular escalation model specifically for inflation purposes and apply that here.
Monthly Production
For the monthly production, users can only clear data associated with a product using the Global Editor:
- Clear Product(s) – This clears out the historical Monthly Data for one or all products. The options are to choose to Clear All data or just the data before or after a specified date.
One note of warning: Be careful when clearing historical production. Since Monthly historical production is an unqualified data, clearing product this way wipes out all historical production even in alternate qualifiers.
Ownership
The available fields for editing ownership using the Global Editor are:
·Clear Adjustments – Clears all the ownership adjustments for the specified product for for all cases selected.
·Copy Effective Qualifier – Allows the user to copy the ownership from the effective qualifier into any of the listed qualifiers.
·Copy From Existing – Allows the user to copy existing ownership values from another case to all cases selected. To copy the ownership set up in a case, drag the case from the Case List directly
into the available slot called “Input Case ID”. Alternatively, input the Case ID of the case into this slot.
·Copy Qualifier – Allows the user to copy the ownership values from any of the alternate qualifiers. All available ownership options (including initial ownership, reversions, and adjusted ownership) in the alternate qualifier are copied.
Phase Configuration
Use this to change the phase configuration selection for the cases.
·Phase Configuration – The Phase Configuration field is used to change the product setup on the selected cases to one of the Phase configurations set up in the Database settings.
Prices
These are the available fields for editing prices using the Global Editor.
- Clear Prices – Clears all the case-specific prices for the specified product for all cases selected. Prices are only cleared for the selected product.
- Copy Effective Qualifier – Allows the user to copy the prices from the effective qualifier into any of the listed qualifiers.
- Copy Qualifier – Allows the user to copy the prices from any of the alternate qualifiers. All available prices in the alternate qualifier are copied.
- Energy Factor – Allows the user to apply an energy conversion factor to a gas product using a model. This is useful when the gas price is in per MMBTU.
- Price Models – Apply a price model for the selected product as described in the Models section above.
Shrinkage
These are the available fields for editing Shrinkage using the Global Editor.
- Clear Shrinkage – Clears all the case-specific shrinkage values for the specified product for all cases selected. Since shrinkage has both Add and Percent Shrinkage, clear both on separate calls.
- Copy Effective Qualifier – Allows the user to copy the shrinkage from the effective qualifier into any of the listed qualifiers.
- Copy Qualifier – Allows the user to copy the available shrinkage values from any of the alternate qualifiers.
- Shrinkage Models – Apply a shrinkage model as described in the Models section above.