
Recompletion Cases
Recompletion cases are created in PHDwin so that the recompletion automatically starts after another case has reached its ECL. This can be used to model cases such as a behind pipe zone that may not come online until the previous one becomes non economic. PHDwin finds the economic limit date of the first case and then sets the Case Start Date to the next day. Any other optional offset can be used to force the projection (Seg1) to begin at any number of days later. Since the cases are dynamically linked, the recompletion case should start on the proper day, even if the base cases economic limit changes due to a change in pricing, expenses, or some other factor.
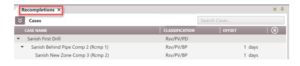
The following image displays how two cases would be linked with an offset entered.

To Manage Recompletion Cases
To view the Recompletion form, go to the Forms flyout on the left-hand side and double-click on Recompletions if it is not already in the view. In the standard view, it is added as a flyout on the right.
Adding and editing Recompletion links
Viewing cases on the Recompletions form
By default, PHDwin displays the recompletion tree for the active case plus any cases that are linked to it. If the active case is not a recompletion case, no case is shown on the tree. Recompletion cases are offset below their respective base cases.
Creating new Recompletion case from the case list
If the base case has already been set up, a Recompletion case can be created from the case list. To create a Recompletion case from the case list:
1.Right-click on the base case in the Case List and select Create Recompletion. Note: select multiple cases at once to create Recompletion cases for all of them using this approach. Just select the cases using Shift + Click or Ctrl+ Click.
2. The Recompletions form should open and display the newly created recompletion case(s). This is the only time you can view all new recompletion cases on the tree. By default only the active case and its links show up in the tree.
3. Set desired offset days by double-clicking on the offset (by default it is 0 days) and entering the desired offset days. The offset is the number of days between the base case’s ECL / recompletion case start date and the beginning date of the 1st segment of the major phase projection. The Eco Start Date of the recompletion case is the ECL of the base case while the projection start date for the first segment of the major phase is Eco Start (+ offset). For recompletion cases, the Case Start Date or the Beginning Date of the major projection cannot be changed. The Case Start Date is linked to the ECL of the base case.
4. Settings are automatically saved to the cases. A recompletion case has the drilling rig icon next to it on the case list.
Linking Recompletions cases using the Recompletions form
If two cases have been created, to link them using the recompletion form:
1. Go to the Forms flyout on the left-hand side and double-click on Recompletions if it is not already in the view.
2. Link the cases –
a. First, drag and drop the base case from the case list onto the recompletion window.
b. Then, drag the recompletion case directly on top of the base case so that it is offset from the base case.
c. Repeat for as many recompletion links as desired.
3. Set desired offset days by double-clicking on the offset (by default it is 0 days) and entering the desired offset days. The offset is the number of days between the base case’s ECL / recompletion case start date and the beginning date of the 1st segment of the major phase projection. The Eco Start Date of the recompletion case is the ECL of the base case while the projection start date for the first segment of the major phase is Eco Start (+ offset). For recompletion cases, the Case Start Date or the Beginning Date of the major projection cannot be changed. The Case Start Date is linked to the ECL of the base case.
4. Settings are automatically saved to the cases. A recompletion case has the drilling rig icon next to it on the case list.
Removing recompletion links
To remove a case from the tree, click the ✖ next to the case name. This removes the case. If the deleted case is the base case for a given tree, the entire tree will be deleted. Remember to Cancel the changes if this is not the desired intention. To delete all cases, click the ✖ in the upper right corner. Unless “All Cases” is checked, clicking the ✖ does not delete all recompletion links in the current scenario, it just deletes the branch in view. If “All Cases” is checked, however, all recompletion links in the scenario will be deleted.
Sharing the Recompletion Tree between Scenarios
Links created in the recompletion tree can be shared between scenarios. This saves time to re-link each recompletion case for different scenarios. To do this, go to the scenario settings and link the scenarios and choose that they should share the same recompletion tree.