
Report Tables
PHDwin reports have built-in report tables that display a chosen set of output values to be printed on the reports. However, report tables can be modified to display desired output values on reports. Hence, for output values that are not included in the standard report tables, custom report tables can be built and used to display those.
Setting up a custom table creates custom output tables in the PhdReports database which can contain any value that needs to be reported. For example, users can create a table with:
- Volumes from any product stream – the volumes can be reported as gross or net to a specific interest.
- Revenue, costs, or taxes associated with any product.
- Results of cash formulas.
- Overall cash flow – discounted or non-discounted.
After creating a report table in PHDwin, link it to a standard report or a custom report in PHDwin. Then, when the report is run, the custom table gets sent to the PhdReports database in the instance of SQL logged on to. From there, you can export, query it, manipulate it, etc.
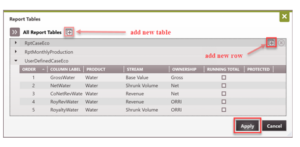
To Add or Delete a Custom Report Table
-
Go to the Reports Ribbon and click on Report Tables.
-
Click on the + button next to All Report Tables.
-
Rename the table as desired – this is the name of the table when it is outputted to the PHDReports database.
-
Click the + next to the table name to add columns to the table. Adjust these settings:
- Column Order – The order columns are displayed in the table. To change the column order, drag and drop the columns in the correct order, or type a higher number than the current list and the row will jump to that spot.
- Column Label – Type in the label for the column header in the SQL database.
- Product – Select the product (including cash formulas) that is defined in the database.
- Stream – Select which stream to report. The base value stream represents the production volumes input into PHDwin and should also be chosen for cash formula products. Other options include costs, taxes, and revenue.
- Ownership – Select the ownership that should be applied:
- Gross – The Gross Stream is the 100% (8/8ths) interest.
- Co WI – The company Working Interest is the Working Interest on the ownership form.
- Net – The Net Interest is designated in the Database Settings under Streams. The Net Interest for costs is typically Working Interest, for volumes/revenue it is revenue interest.
- ORRI – The Royalty Interest specified on the Ownership form.
- ECL – The ECL interest is used to calculate the economic limit. If a stream is netted down by WI, the ECL interest is 100% (gross). If a stream is netted down by Revenue Interest, the ECL Interest will be Lease NRI.
- Running Total – If this is checked, the value is a cumulative/running total as opposed to monthly or annual values.
- Protected – Any column that is “protected” is required for TRC’s default/standard reports and cannot be deleted.
To Delete a Custom Report Table
- Hover over the report table name.
- Click the X button to delete the table.
To Link a Custom Report Table to a Report
In order to look at the output for custom report tables, the first step is to tie it to a report in PHDwin. Then, when the report is run, the custom table will be built.
- Go to the Reports Ribbon and look for the dropdown that says Reports.
- Change the dropdown menu to choose the report that the table should be linked to.
- Click on the icon to configure the settings for that report.
- Under the Economics tab, update the following:
- Choose the number of years to output for the report table, along with the number of years that shows monthly detail.
- Put a check next to the name of the custom report table created so that it is linked to the report when it is run.
- Click Save.
- Run the report and see the instructions below to find the table in SQL.
Finding and Exporting the Table from SQL
Once the table has been linked to a report, run the report to build the table. The table gets generated in the default PhdReports database.
To Find the Table that Was Generated
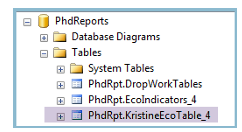
- Go to the Start Menu and click on Programs. Find and open Microsoft SQL Server Management Studio – this program is the interface to view the tables in the SQL database. It may have been installed when you downloaded SQL. If not, find the free installation file for Microsoft SQL Server Management Studio online and install it.
- Look for the database named PhdReports.
- Find the name of your table – it will be named something such as “PhdRpt.YourTableName”. For example, if the table is named “KristineEcoTable”, it will appear in SQL Management Studio as PhdRpt.KristineEcoTable. Each table name also has a number appended to the end. The number begins at 1 and increases by 1 each time the report is run.
Exporting Tables from SQL to Excel
One way to export the data to Excel is by using the SQL Import and Export Wizard. Here are the basic steps:
- Open Microsoft SQL Server Management Studio and right-click on the PhdReports Database, then choose Tasks > Export.
- Choose the data source – this should be the PhdReports database.
- Choose the destination – this should be Microsoft Excel. For the path, choose an existing file or type in the name of a new workbook that should be created.
- Choose the tables to export – this is the name of your report table.
- Set any other properties and click Finish.
- Open the file path that was chosen in step 3 to see the Excel file.
Disabling Auto-delete or Removing Old Tables
To Keep the Tables from Being Deleted
By default, when you close the preview window for the PHDwin report, all tables will be deleted from the SQL database. To disable the table deletion:
- Go to Microsoft SQL Server Management Studio.
- Find the table named RptMeta.ReportNames and right-click to select Edit Top 200 Rows. The last column is named InTestMode. Set all the rows to True and the table deletion will be disabled.
To Clear Out Old Report Tables from PhdReports Database
With auto-delete disabled, the report tables may pile up in the PhdReports database. If PHDwin crashes during a report run, the table also stays there. Use the instructions below to clear out the tables by user name or report run number.
-
Expand PhdReports, then Programmability, then Stored Procedures.
- To delete by ReportID: Find the procedure named PhdRpt.DeleteReportControl and right-click on it, then choose Execute Stored Procedure. For the Value, enter the report ID (or number appended to the end of report tables) that you’d like to delete, and click OK.
- To delete by User: Find the procedure named PhdRpt.DeleteReportsByUser and right-click on it, then choose Execute Stored Procedure. For the Value, enter the UserID that you’d like to delete, and click OK. The UserIDs associated with each report can be found in the PhdRpt.ReportControl table.