
Backing Up Your SQL Database
One way to send your database to someone is by creating a backup (.bak) file. If you zip up the .bak files, they are fairly small and easy to send. You can open backup files by restoring them. Restoring a backup file creates a new database and does not overwrite any existing database. The other (recommended) way to share your database with someone is by creating a .phz3 transfer file.
A .bak file is not backward compatible. Hence you can restore a backup file created in SQL Server 2019 into another SQL Server 2019 or higher (like SQL Server 2022, etc). If the .bak file was created in SQL Server 2022, it cannot be restored in the 2019 version. On the other hand, a .phz3 file is SQL Server version agnostic. This implies that a .phz3 created in a SQL Server 2022 version can be opened in a 2019 version. See transfer 626 section of this help file for more information.
Backup files can be created in 3 ways:
·MS SQL Server Scheduled Backups: Both the Standard and Express Editions of SQL Server have approached for automating backups of databases on a scheduled bases. This is not covered in the helpfile.
·Auto-backup on roll-forward: When TRC Consultants, LC release a new build of PHDwin V3, users want to update to the new version. For users to be able to use their databases in the new build, the SQL server instance needs to be upgraded to be supported in the new build. This is what is referred to as rollforward. A backup file is created for each database in the instance during the rollforward process. Similarly, if you have a database that was created in an older build of PHDwin, when you transfer it into your instance, the database needs to be rolled forward to be supported in the newer build. During this database specific rollforward, a backup file is also created for the database in its original build.
·Manual Backups: This is a backup that is initiated and managed by the user. This section of the helpfile focuses on this type of backup. You create and restore backup your databases from within PHDwin or using MS SQL Server Management Studio.
Creating, Viewing & Restoring Backup Files from within PHDwin
Creating a backup
1.Open PHDwin and log in to any database in the instance if you are currently not logged in to one.
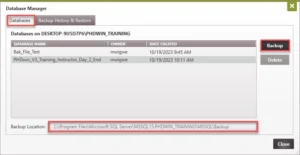
2.Go to the Database Settings and click on Database Manager.
3.In the Databases tab, select the database you want to backup and click Backup. This creates the backup file of the selected database.
4.To view the backup file, click on the Backup History & Restore tab. Every backup created for databases in the instance of SQL Server should be listed here. You can also view the backup file by going to the Backup location specified on your machine. See the section below if you cannot see your backup files.
5.Click Close to close the Database Manager window.
Restoring or Deleting a Backup file
1.Open PHDwin and log in to any database in the instance if you are currently not logged in to one.
2.Go to the Database Settings and click on Database Manager.
3.In the Backup History & Restore tab, select the backup file you want to restore and click Restore.
4.In the Restore Database window, enter the name of the new database. You must enter a new database name as restoring a backup file creates a new database and does not overwrite any existing database.
5.Click Restore to finish the process.
6.If you go back to the Databases tab, you should see the newly created database.
7.To log in to the new database, you need to close the Database Manager, go to the Home ribbon, in the Tools section, click on Change Database, select the new database and click Login.

I can’t see my backup files
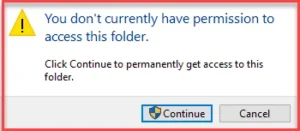
It is possible that you created a backup file but it does not show up in the Backup History & Restore tab. This could be permissions related. You most likely do not have permission to access that folder. If this folder is on your personal computer, try to open the folder to access the files via your File Explorer and you would get a message like the image below. Click on “continue” to gain access. If you go back to Database Manager > Backup History & Restore, you should be able to see all the backup files.
Creating & Restoring Backup Files using MS SQL Server Management Studio
Creating a backup
1.Open up SQL Server Management Studio.
2.Connect to the server that you store the PHDwin databases on.
3.Go to the left pane, the Object Explorer, to see a list of all databases.
4.Find the database you’d like to backup. All PHDwin databases will begin with “PHD_” and then you will see the name you had chosen for it. Right-click on it and choose Tasks > Backup.
5.Leave the default options as they are, optionally modifying the Destination that you’d like to save the backup to. To change the destination:
a.Click on Remove to remove the default location. If you do more than one, the user will need both files to do the backup.
b.Click on Add to choose the new location. After specifying the directory, you’ll have to give the backup file a name. It is best to end the name in .bak so that it is recognized as a backup more easily when you go to restore.
6.Click on OK to save the backup.
Restoring a backup
1.Open up SQL Server Management Studio.
2.Connect to the server that you store the PHDwin databases on.
3.Go to the left pane, the Object Explorer, to see a list of all databases. All PHDwin databases will begin with “PHD_” and then you will see the name you had chosen for it.
4.Right-click on the Databases and choose Restore Database.
5.To overwrite a database, you’d choose the name there. To create a new database using the .bak file, type in whatever you’d like to name it. Make sure that it begins with “PHD_” so that it is recognized by the program when you go to open it.
6.Choose to restore “from Device” and browse for the .bak file that you have saved.
7.Select the backup sets to restore – usually there will only be one, so put a check mark next to it. If there are multiple backups in the file you’ve chosen, you can choose the backup by the date and time.
8.If the backup file is not in the instance default backup location, you need to relocate all files to the default location. If this step is skipped, the restore will not be successful.
a.In the Files page below General, check the box that says “Relocate all files to folder”.
9.Click OK.